Erik's blog Discussing open source innovation, personal fabrication and a new and better world
Ik kreeg laatst deze NU.nl link doorgestuurd en ben eens op onderzoek uitgegaan. Er werd gesteld dat door duurzame energieopwekking de CO₂-uitstoot binnen het ETS systeem met 15,5% gedaald is t.o.v. het jaar ervoor....
Arguably, our biggest power is the ability to choose how we interpret things. Given the recently unfolding events in the Israel-Palestine conflict, jumping to quick conclusions and rushing to judgement is as common as...
Sorry for for the click-bait title. There is not actually a secret, it’s been known for a long time that coal plants emit a lot of dirty substances besides the problem of greenhouse gases....
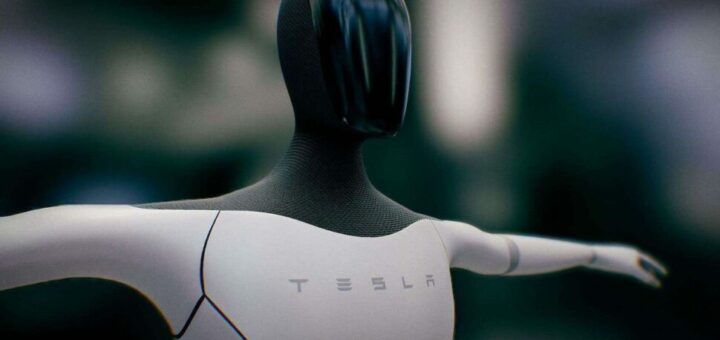
Het gaat inmiddels ECHT goed met Tesla. SpaceX gaat met Starship letterlijk naar de maan, maar bij Tesla-fanatiekelingen is de meme “To the moon” populair. Ondanks supply chain disruptions (o.a. door COVID en de...
(I usually write in English here, forgive me if you need to use a machine translation!) We vinden het vanzelfsprekend dat het elektrische net goed werkt, echter gaat er enorm veel menselijke energie zitten...
As you have probably noticed, I’m a big believer in Tesla. Also, I think there’s a need to become more sustainable, and electrification of transportation and energy storage are part of the equation to...
Since 2018 I’ve been less involved with Ultimaker, the company I ran with my co-founders. While I really miss the amazing people there and the vibrant atmosphere, Ultimaker has “grown up” to a point...
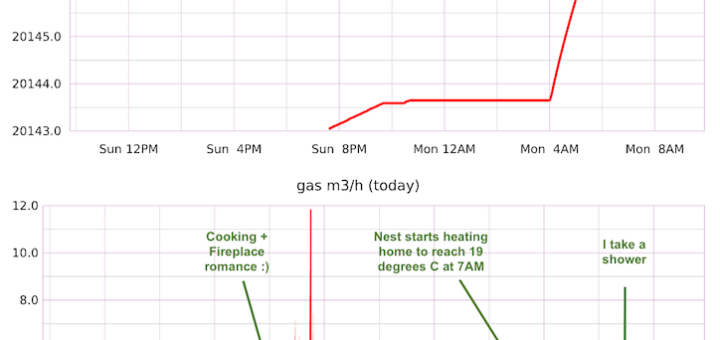
In a previous post I started collecting my own time series data. Besides logging gas usage I’ve also started logging my water consumption. For this I use a reflection sensor hooked up to the...
Early this year we finally have a (bought) home of our own, I’ve been working to be more sustainable with respect to energy efficiency in addition moving away from fossil fuels for our two...
I frequently listen to the AllThings3D podcast during my commute, I really recommend it (Link). If you want to learn about relevant developments in 3D printing, it’s a great source and digest. Tonight I...
My personal goal is to really impact global wealth in a positive way. Often people are surprised when I say I studied economics and now develop and sell 3D printing technology. This could not...
We were lucky to be featured in Tegenlicht. Tegenlicht are exceptional documentary makers who go in depth into major issues of humanity. The part where I’m being interviewed starts at around 34 minutes. Most...
Now for something that’s not related to 3D printing (well, not directly), but so insanely cool that I have to blog about it right now (no, this can’t wait another day)! Through a friend...
I’m really excited that our company has just started offering fully assembled Ultimakers in addition to the kits!! The Ultimaker: the Fast, high-detail 3D printer! Don’t worry, we won’t drop the kits from our...
At Codebits, an amazing event organized by Sapo (an awesome, innovative Portugese company) a lot of nice stuff was happening. Besides a 48 hour programming contest, there was a hardware hacking den. This is...
Beautiful view of the river in Bern With al the busy-ness at Ultimaker I haven’t traveled much. Finally I had a nice trip to Switzerland, to give a talk and meet our friends from...
We’ve been really busy with many developments at Ultimaker! Most notably: the Ultimaker Controller, reducing lead times, adding individual 3D printer parts and lowering the overall shipping costs. Also, we’re releasing an improved version...
Usually, during the weekend I spend my time working on Ultimaker as a company, or I have social obligations. For this weekend, my wife surprised me in an original and heartwarming way. She said...
De afgelopen tijd zijn er een paar evenementen geweest waar ik nog niet veel over geschreven heb. Daar wil ik bij deze verandering in brengen. Ik heb een presentatie gegeven op How Do You...
Last week was the 3D printing event in Eindhoven, the Netherlands. Ultimaker exhibited there together with about 20 other Ultimakers, shown by their proud operators (see this Ultimaker blog post). There were also RepRaps,...
Bernhard, an Ultimaker power-user at MetaLab Vienna, has gotten the Sprinter firmware working on an Ultimaker. Sprinter is written by Kliment and Caru, based on Triffid Hunter’s codebase, based on FiveD [update]oops, it’s based...
You should see this amazing solar powered 3D printer that sinters ordinary sand into glass. Both the source of energy and material are pretty much unlimited. I wonder if you could one day print...
Good news, everyone! Finally, the Ultimaker is shipping. It took much more work that we had ever imagined, and we knew it would be hard to design a complete machine from scratch and also...
I’m frequently wowed by progress in CAD software to become both more powerful and more easy to use. Still its good so see how great ideas took quite a lot of time to show...
Peter Hanna of Ars Technica wrote an article on copyright implications once 3D printing becomes more common. Surprisingly, when opening the article I saw a picture of myself (I had nothing to do with...
The last few months have been very busy ones for us, we done quite some testing with the Ultimaker, started a company, searched for the right material suppliers, worked on our webshop and so...
With your feedback, my cousin Gerald has taken the new stepper driver’s design a step further. Click here to read more.
Ik was zojuist op “De wereld draait door” met onze Ultimaker! Hier is de aflevering nogmaals te zien. Om 6 minuut 50 seconden begint het over Ultimaker en 3D printers:Leuk om alle reacties te...
First of all I would like to introduce myself. The current PCB layout, click on it for a larger version. My name is Gerald Ebberink and I am a first cousin of Erik. During...
Photo: A christmas tree designed by Paulloricca and printed on the Ultimaker 3D printer in biodegradable PLA.
Photo by John Abella I took my Ultimaker to BOTACON 0 (the first BOTACON of, I’m sure, many BOTACON’s to come!). There, I was giving a talk on the collaborative ecosystem that is emerging...
Hi everyone, Some people have been asking for a copy of the PDF of my RepRap research. Perhaps you didn’t find a link to it while you were in fact interested in reading it...
So much is happening, that I hardly have time to blog it all! In the meantime I’ve finished my thesis, presented at FSCONS and graduated! And if that wasn’t enough, last week I demo’ed...
Update: Phooky merged this improvement into the official branch, thanks!! There was an issue with ReplicatorG posted a while ago: The stl preview pane seems to be fixed at 10cm x 10cm x 10cm....
Some things are just no fun, and in a project driven by volunteers, these parts tend to be neglected. Making things user friendly doesn’t help yourself, because when you get to the point where...
Vanavond was er bij de VPRO een item op Labyrint met als onderwerp: “Alles is maakbaar!” Van FabLab.nl: …besteedt het wetenschapsprogramma Labyrint (VPRO/NTR) aandacht aan de technologie van 3D printen. Er zijn o.a. opnames gemaakt...
[This article is in Dutch, but you can Google Translate it (click)] De Night of the Nerds was een groot succes! Deze werd gehouden in het Technologiemuseum NEMO in Amsterdam. Foto: (c) Night of...
In the RepRap community, you can observe several interesting applications of domestic manufacturing. A manufacturer will probably not make their product compatible with competing products. But what if you still want this? How cool...
Update: Google responded on my blog! To read it, click here. Below is my open letter to the Google SketchUp team, aimed at Aidan Chopra, SketchUp Evangelist and John Bacus, the Product Manager for...
The slides of our joint talk are now available. First up are Rhys Jones and Adrian Bowyer, the third section is my part: RepRap @ FAB6 International Conference, Amsterdam View more presentations from Erik...
Today was our talk on RepRap at the FAB6 conference in Amsterdam at the Royal Academy of the Arts and Sciences. Rhys Jones introduced RepRap and showed his latest developments in multiple materials. Adrian...
I just made a serendipitous discovery:I printed a very narrowly fitting freely rotating Bowden coupling and it had such a good grip on the PTFE that I printed another with just a little more...
Our wedding day was really unforgettably beautiful: Below is my original post about “the making of the cake topper”. It stood there perfectly because my best friends made a gorgeous cake (such a great...
My 3D printed cake topper! Friday the 9th of July, I’m getting married to Esther! I’m really looking forward to this really special day. It takes a lot of preparation, but it’s also been...
In December last year, I became the proud new owner of Leo (after Leonard Darwin), the son of Charly (Charles Darwin (my earlier machine)). It didn’t take 9 months to fully develop, but it...
In March 2010 I gave a talk at the MIT Sloan School of Management on RepRap and the democratization of Fabrication Technology and emergence of open hardware communities, entrepreneurial spin-offs, etc. Bre Pettis and...
A while ago I put on my RepRap ambassador hat again which resulted in a newspaper entry in a Dutch newspaper. Since it’s slightly old news now and I’m allowed to cite works that...
What I really like about the Thingiverse physical object repository is that people are not just adding awesome, innovative [1, 2] and useful [1, 2] new content. They also innovate in how they publish...
Together with Siert Wijnia from FabLab Protospace I gave a workshop and presentation at SHiFT 2010 in Lisbon, Portugal. The topic was Personal Fabrication while highlighting the roles of FabLabs and the RepRap project...
Televisie Some time ago I had a visit by the Omroep Brabant TV crew. From RepRap Misc The item was broadcast on 30 March 2010. The RepRap part starts at 5 minutes and 30...
(English translation here and here) RepRap was weer uitgebreid in het nieuws. Gisteren in de “Trouw”: Krant Klik hier voor het online artikel! Radio Gisteravond was ik met Siert ook in de uitzending van...
I went to the USA to visit Zach and Bre and the others from Makerbot and to give a talk at MIT for an innovation lab. I proposed to give a demo, but didn’t...
Are you operating or building a 3D printer? (RepRap, Cupcake CNC, RapMan, etc.) We still need some more responses for the data to be statistically significant. So if you have not done the survey,...
From Erik's RepRap parts For some, the fact that the mini-mendel isn’t a finished product is a reason not to try it. For me, it’s the opposite. I’ve now printed all parts for the...
There are so many ways to get to a 3D model. Some are really great if you like programming. It is really powerful to use logic to generate objects, but not for all models....
I finally finished splitting and uploading the video’s, so here it is in a Youtube playlist as well: Source: video.fosdem.org A full page interview on RepRap in the NRC, a dutch quality newspaper! Some...
RepRap got coverage in a well respected Dutch newspaper, NRC.next. They also made a blog post with an interview, the original post is in Dutch, but here’s a (poor) google Translation to English. The...
You think vanity and Yoda do not go together? The force may be strong in this fella, but he used a very powerful scrubbing lotion to make him look much younger. 🙂 Stratasys sent...
Even things that are peripheral to the RepRap and makerbot are going through some remarkable evolution! It not that strange, because they can really make life a lot easier. Some accessories, like spindle holders,...
Nick Jones from Gartner made an interesting remark: “[A]s one of my clients pointed out yesterday, do we really want an affordable domestic fabber? Fabbers will likely “print†objects using some form of plastic....
We demonstrated the RepRap at NPOX (15 nov. 2009). It was in the “Beeld en Geluid” building which was a huge building, but beautiful at every scale. We were positively surprised by the way...
The RepRap Day at Protospace (14 nov. 2009) was a great success. (see also, more pictures by Bas) The plan was to print an entire machine at the event, but we did more talking...
In the previous post, I described the rationale for adding a support material capability. It’s not needed for every object, but to have consistent results with tight tolerances, for many objects you cannot do...
In general, there are three general methods to making objects. Formative: By (de)forming matter, such as bending a metal beam into an angle. Or a big steel sheet into an enclosure, or making a...
Op zondag 15 november organiseert ProtoSpace de eerste grote RepRap meeting van Nederland! Iedereen die een RepRap heeft, er een aan het bouwen is, of erin geïnteresseerd is nodigen wij van harte uit om...
I was honoured to be asked to speak at the Corporate Entrepreneurship and Open Innovation. Speakers included Henry Chesbrough (!), an authority on open innovation, so needless to say I was challenged to give...
Courtesy: Blackbag.nl BoingBoing blogged about reproducing keys from distant photographs. This made me think back off what we were doing at Hacking At Random ’09 with our RepRaps. Ray had created an STL model...
I’ve designed a little part that allows you to connect the extrusion drive mechanism, which pushes the plastics, to the extruder which it is pushed through. Here you can see a printed version, attached...
After the big success of our workshop at Protospace, there will be another one! Since it will be in Dutch, the rest message is as well. Na het grote succes van de workshop bij...
I was honoured to present RepRap with Adrian Bowyer, who is the one who came up with the idea of creating a self-replicating machine that would ‘live’ in symbiosis with humans. Presenting our RepRaps...
I’ve been working on getting production up. Because I’m going on a holiday I guess I’ll show of the results 😉
This is a simplified simulation of the mechanical “Cartesian bot” of The RepRap. It allows you to play with things like play (a.k.a. backlash), tension of the belt that drives the axis, etc. You...
I’ve created a gcode processor in php. [Edit] This is now documented here: http://objects.reprap.org/wiki/3D-to-5D-Gcode.php[/edit] It allows you to rewrite 3D Gcode from tools like Skeinforge and use them with the 5D firmware. I’ve added...
After Siert spent 5 minutes in Rhino CAD software, we had a printable model. The picture shows the bracket being printed. Installed on the WiFi bike Being at Reboot 11 was amazing. The theme...
I’m excited to go to Reboot. Siert and I will be (re)presenting the RepRap project. We plan to take 2 fully functional RepRaps with us. They have already been churning out parts to make...
Click on the image to see a bigger version. The detail is really good. I decided to print a chess piece. I was amazed by the quality. I really love the new extruder we...
In the group at Protospace (FabLab Utrecht, the Netherlands) we designed and built a new extruder. Most of the design work was done by Robert, and a very good result was obtained with the...
I personally think that the RepRap is a tool of personal empowerment. It allows you to take matters into your own hands. Are you not completely satisfied with some object that you use? You...
The exact topic is still preliminary, but my masters research is going to be on user innovation in fabrication and its interrelation with the commercial players, their products and their customers. The creation of...
Dit is een introductie tot de RepRap. Technische kennis, bekendheid met Open Source of de RepRap wordt niet verondersteld. Omdat de geluidskwaliteit niet optimaal is heb ik ondertiteling toegevoegd. De slides zijn hieronder beschikbaar....
If you agree with me on this, please take less than 30 seconds to nominate RepRap for “Most Likely to Change the Way You Do Everything”:
The driving mechanism that pushes the thermoplasts or metals through the heater chamber (for making them liquid) is a very critical one. It needs to push the plastic with a strong and reliable grip....
Today, antifuchs designed a stylus to be 3D printed on a home fabricator such as the RepRap or Makerbot. It was posted as a Thing on thingiverse.com. The stylus (click picture for lager version)...
There’s a reason why this video spreads like pig flu… Highly contagious. Not just harmful things can spread exponentially, also the beautiful things in life! (P.s. the HD version is highly recommended if it...
I wanted the RepRap to make beeps to confirm whether everything is connected and working. But of course you can have it make music as well! I wrote a script to make G-Code movements...
Video: Festo Bionic Learning Network 2009 Zie dit YouTube filmpje. Behalve dat het een erg mooi promotiefilmpje is zit hier een duidelijke visie achter. Bij FESTO is het interessant om te zien hoe zij...
From the RepRap blog: Progress is being made by Rhys Jones to have the Replicating Rapid prototyper make more of the parts that you need to make another one. I think that this is...
I passed my last exam I have to do for my masters degree! I ‘only’ need to finish an internship and write my thesis… and then I’ll be Master of Science, in addition to...
Debugging sucks… I’m (re)building my machine, and one thing I’m missing is transparency. We’re adding layers to keep complexity manageable, but inevitably some transparency is getting lost along the way. There are several interfaces...
Two weeks ago I made print circuit board for a more advanced stepper motor driver, using the IMT-901. This is a chip that can drive power to the motor and control motion in a...
Update: fixed again. Update 2: fried again. Remembering from the top of my head that I had some PCBs with the silkscreen reversed, with an incorrect measurement I concluded that it must have been...
I read the Guardian article about “building an open source world”, on which I have some comments about this. In the article this remark is made: “Open source hardware doesn’t have the same power...
Have you ever been in a foreign country in need of a translation? Or you stumble across a manual that’s only in foreign languages… Going to google and typing over all the text tedious....
On my HTC Touch Cruise phone, I’m using a Android Linux and WM6 dual-boot setup. Up to now, when using WM6 on my phone I used to sync my phone with OGGsync to sync...
The Bits From Bytes kits contain a board with SD-Card functionality. It is not clear what licence BfB will attach to it (it should be GPL for the Darwin based design, though). Anyway, SD...
The digital and physical world were once separate. Now, there are more and more physical products with a link to the digital world. The extreme situation is that a product ID will have a...
There are now an estimated 1000+ RepRappers! These people are actively building on their own instance of the Open Source Replicating 3D printer. When I started working on my RepRap in May 2008 (8...
Oskay, from Evil Mad Scientist Laboratories made this thing: a snow flake generator. Remember: do not eat the yellow snow. I absolutely love it! I’ll tell you why… Not as much that we can...
I’ve settled for a WM6 equipped HTC device: The HTC Touch Cruise. A fairly nice device. It doesn’t look as fancy as the iPhone, but it is very well equipped and there are many...
Monday evening, I’ve been to a reading on peer production in Amsterdam (@ Waag Society). Besides the excellent talk, I met some wonderful people as well! I had heard and read about the peer...
You may have noticed ‘Use Firefox!’ pictures on many websites. There’s a story behind this which applies to me as well. As a web developer, even when you only use Linux, you inevitably get...
Recente reacties