DIY SD-Daughterboard for Sanguino and Arduino’s.
The Bits From Bytes kits contain a board with SD-Card functionality. It is not clear what licence BfB will attach to it (it should be GPL for the Darwin based design, though). Anyway, SD support was also being developed in a truely open-source fashion based on the Sanguino, by Zach, Bruce Wattendorf and tested and developed in the field by Marius Kintel using the highly anticipated RepRap Motherboard.
After seeing another new release done on Sanguino based 3D printing from SD, I checked it out and I decided to jump on the bandwagon again. It’s been way too long ago since I had time to play with my RepRap. After seeing the scematics and Marius Kintel’s setup, I had enough confidence that I could make a stripboard version. I’m not going to sit waiting for the RepRap motherboard to be produced. If this works, I might mill my own boards on my RepRap.
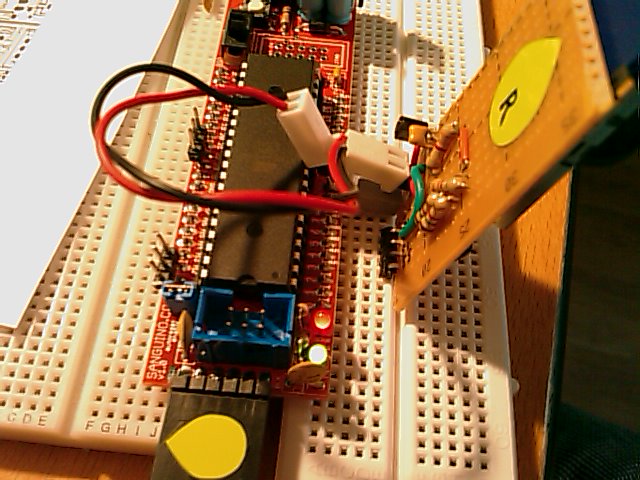
I soldered up a Sanguino and it worked instantly (blinking led probably means that the program is running). It’s made by Zach (most cool things are), so I didn’t expect any less ;)!
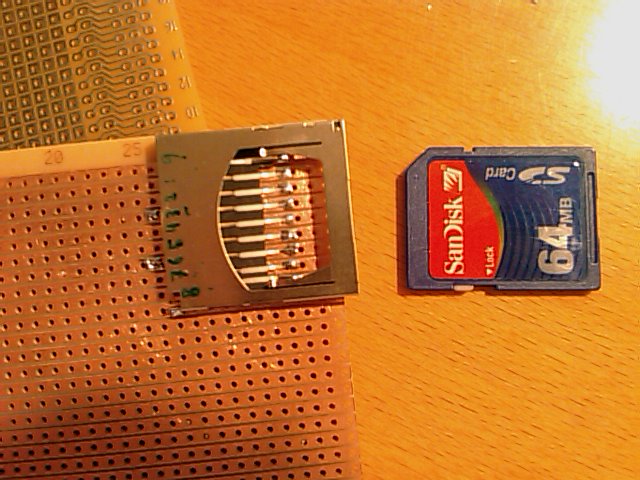
I made a tiny daughterboard for SD using stripboard and a MULTICOMP Push/Push SD card holder (Farnell). I had bought this component exactly for the miraculous event that I had a spare time tinker with hardware.

How I made it
Disclaimer: Please correctly if I say something that is incorrect, I have no education in electronics, just some experience from tinkering.
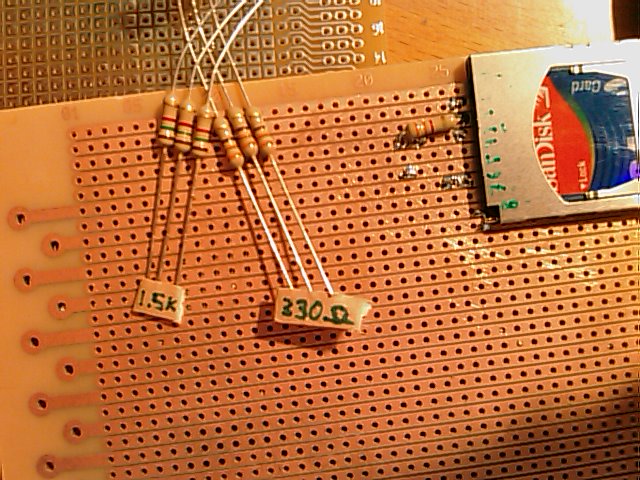
I used voltage dividers as described here.

Because I didn’t have any 1K8 Ohm resistors, I used a 1.5K and 330 Ohm resistor in series for SD/MMC pins 1,2 and 5. These go to the ports SS, MOSI, MISO and CLK respectively. The labels for MOSI, MISO and CLK are on the silkscreen of the sanguino, numbered 4,5,6,7. MISO is a data IO pin and stands for Motherboard in, SD out. MOSI stands for, you guessed it, Motherboard OUT SD in. CLK is the clock, that ticks to signal the changing of data bits. [edit: the S actually stands for SPI, of course… but in my case it’s SD 🙂 ].
I added a voltage regulator (L78L33) on the stripboard, so I just need 5 Volts on the board. I made a two pin header for power input, and a 90 degree angle header.


Getting the Sanguino up and running
I followed the instruction here (no, I don’t need windows), to install my Arduino environment and upgrade it to the sanguino environment.
I downloaded the latest release of the sanguino files, here. [edit: Or so I thought… The official site lists an old version as the latest. 0013 is the latest as the time of writing!]. That’s the sanguino-read-only version below:
  $  cd /home/erik/bin/
  $  rm -R arduino-0012
  $  wget http://www.arduino.cc/files/arduino-0013-linux.tgz
  $  tar xzf arduino-0013-linux.tgz
  $  cd arduino-0013/
  $  cp -R ../../RepRap/sanguino-read-only/trunk/code/cores/sanguino hardware/cores/
  $  cp -R ../../RepRap/sanguino-read-only/trunk/code/bootloaders/atmega644p hardware/bootloaders/
  $  cp -R ../../RepRap/sanguino-read-only/trunk/code/libraries/ hardware/libraries/
  $  cat ../../RepRap/sanguino-read-only/trunk/code/boards.txt >> hardware/boards.txt
  $ ./arduino &
Uploading a program to the board (toggle a port) worked! Excellent.
Getting the Sanguino to access my stripboard SD-daughterboard
I got this:
start
Can't open filesys
couldnt create: RRJOB00.TXT
error opening: RRJOB00.TXT
Ok, that would’ve been too easy if it worked already. My first guess is that I needed to add pull-up and/or pull down resistors on the Card Detect and the Write Protect I/O pins. I connected these to A7 (pull down) and A3 (pull up), respectively. Just like a switch, common practice is to pull a voltage down to 0V with the switch. Therefor, the ‘Card Detect’ has to be LOW (Card inserted, switch closed) and the ‘Write Protect’ needs to be HIGH (no write protect).
I installed disktype (sudo apt-get install disktype). Disktype tells you everything there is to know about a block device and its partitions:
$ sudo disktype /dev/sdd

--- /dev/sdd
Block device, size 59.50 MiB (62390272 bytes)
DOS/MBR partition map
Partition 1: 59.48 MiB (62370304 bytes, 121817 sectors from 39, bootable)
  Type 0x06 (FAT16)
  Windows NTLDR boot loader
  FAT16 file system (hints score 4 of 5)
    Volume size 59.23 MiB (62107648 bytes, 60652 clusters of 1 KiB)
Don’t see anything wrong with this…
I had been trying to include the libraries ‘RepRapSD’, but the ones in the metalab folder of Marius Kintel seem to be more current (please correct me if you have other findings!). You don’t need to install them if they’re in the project folder.
I made these changes to the port assignments:
$ svn diff /home/erik/RepRap/reprap/trunk/users/metalab/GCode_Interpreter_SD/sd_raw_config.h
Index: /home/erik/RepRap/reprap/trunk/users/metalab/GCode_Interpreter_SD/sd_raw_config.h
===================================================================
--- /home/erik/RepRap/reprap/trunk/users/metalab/GCode_Interpreter_SD/sd_raw_config.h   (revision 2539)
+++ /home/erik/RepRap/reprap/trunk/users/metalab/GCode_Interpreter_SD/sd_raw_config.h   (working copy)
@@ -104,11 +104,11 @@
     #error "no sd/mmc pin mapping available!"
 #endif

-#define configure_pin_available() DDRC &= ~(1 << DDC4)
-#define configure_pin_locked() DDRC &= ~(1 << DDC5)
+#define configure_pin_available() DDRA &= ~(1 << DDA7)
+#define configure_pin_locked() DDRA &= ~(1 << DDA3)

-#define get_pin_available() ((PINC >> PC4) & 0x01)
-#define get_pin_locked() ((PINC >> PC5) & 0x01)
+#define get_pin_available() ((PINA >> PA7) & 0x01)
+#define get_pin_locked() ((PINA >> PA3) & 0x01)

 #if SD_RAW_SDHC
     typedef uint64_t offset_t;
After that, it still didn’t work. When I couldn’t think of anything else that I was doing wrong, and seeing how difficult it was to debug SD libraries that I’m unfamiliar with, I resorted testing the connections. When measuring I detected a loose soldering joint! I sometimes use metal-fatigue to snip of wire ends that have been soldered. The uneasy feeling in the back of my brain was warranted: this has probably created a broken joint in the soldering connection. After checking all the points of the voltage divider I gave it another go… and miraculously…
SD Hardware works, next challenges in software
[off-topic] There’s a reason I’ve hardly had any time to work on my RepRap. I’ve been very busy with graduating. I’m in my last year of my studies and within half a year I will hopefully be free to work on the more important things in my live. I’m very good at taking on new commitments that I sometimes hate even while the projects are pretty cool. They might even pay well, but the real solution to feel well about what I do is IMPORTANT things first. And by important, they should be important to ME. I can get really excited and say, this can be done better. Before I know it I’m working on doing something that wasn’t my responsibility but I managed to convince others that I’m the perfect candidate for the job and the soon see that there indeed was room for improvement. The result is a big deviation from what I intended to do with my time. And because I intend to do as I say, I am forced to stop working on the project that is most important to me in my whole life (unless you count relations with people I love as ‘projects’).
[/off topic]
Back on topic. With working SD hardware, I get the following:
)start
Opened dir / on SD.
First file: TEST.TXT
)start
Opened dir / on SD.
First file: TEST.TXT
)start
Opened dir / on SD.
First file: TEST.TXT
)start
Opened dir / on SD.
First file: TEST.TXT
)start
Opened dir / on SD.
First file: TEST.TXT
)start
Opened dir / on SD.
First file: TEST.TXT
)start
… you get the point. I put a test file there with two lines of G-Code in it, called ‘TEST.TXT’. The fact that you see ‘start’ multiple time implies that it’s restarting. I get the feeling that I need to compile under windows or upgrade my ubuntu to 8.10, which I didn’t get around to (see my emotional rantings about my distractions!)
LESSONS LEARNED:
- Things that can do better don’t always have to be improved by yourself. Learn to say no.
- Don’t snip off wires by wiggling them back and forth to let the metal fatige break of the wire end. Every 1% or so a connection will break where you didn’t want it without noticing it (well, only after extensive debugging!)!
- I should really dist-upgrade my Ubuntu. Its becoming a pain now. I’ve got many changes to ubuntu that will have nasty interactions with changes made by the Ubuntu developers, so simply upgrading is not the best option (especially if you did that for 5 years in a row). I’d been waiting for a desktop system to install to make a more gradual transition, but the motherboard was DoA (Dead on Arrival).
To be continued…
[update] Using the windows version (slightly newer compilers) the sanguino doesn’t crash:
start
First file: TEST.TXT
ok:128
ok:128
error:
Yet I still have to hook it up to the other boards of the 3D printer.
[/update]
Recente reacties