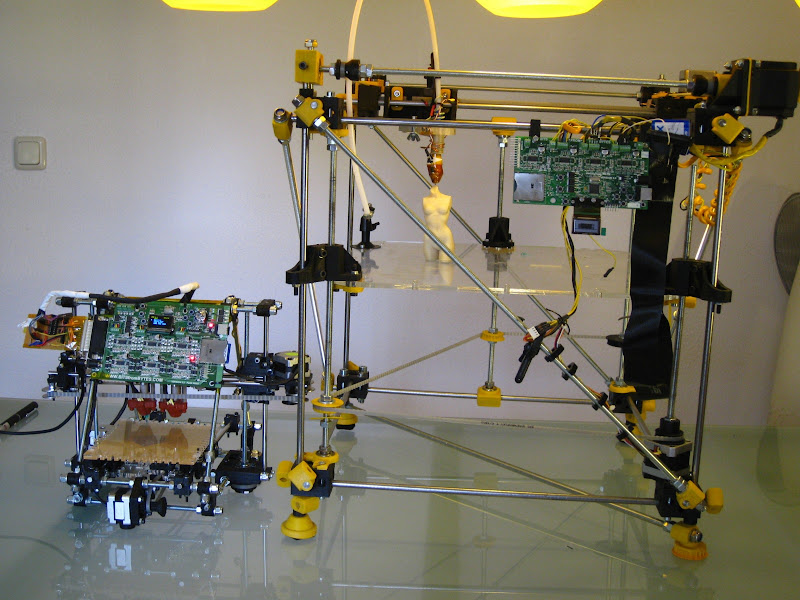
Mini-mendel built and working!
I went to the USA to visit Zach and Bre and the others from Makerbot and to give a talk at MIT for an innovation lab. I proposed to give a demo, but didn’t dare bring one of my Darwin RepRaps on an airplane. They are very heavy and fragile, unlike the Mini-Mendel, which is quite sturdy compact and lightweight and can fit in a smaller, strong box. I had brought the printed parts (blog post about ordering, printing and preparations here) with me to the US and worked on them at New York Resistor. Besides having a really great time there, I also made a lot of progress. I barely got it running in time for the demo, I had done a proof of concept extrusion with X-Y movement, but it wasn’t exactly what you would call 3D printing yet, let alone reliable printing.
In the day after the presentation I fixed the most important problems (belt tension, belts running off the pulleys, writing firmware bug workarounds, etc.). The fact that I didn’t have a unix based toolchain for compiling the PIC32 code of the BitsFromBytes board, did make matters really complicated.
Overly ambitious I had been trying to get multi-material working on their v3.1 board. I actually did a short amount of multi-material extrusion but couldn’t repeat the same with different g-code (after deleting the file that worked from the SD card).
The parts for the Mini-Mendel were printed with both the Darwin from the Q1 2008 cast parts from BitsFromBytes and the Darwin offspring machine that I’ve printed with the former machine. So it’s at least in part a third generation machine, but the majority of the parts came from my older machine (I’m so used to the process).
Anyway, a picture says a thousand words, so here’s a moving picture (and no more talking):
(BTW: if you didn’t pay attention to the song’s lyrics, you should listen to it again!)
The machine is considerably smaller than the Darwin (or regular Mendel), as you can see from the following picture:
 |
| From RepRap Dev |
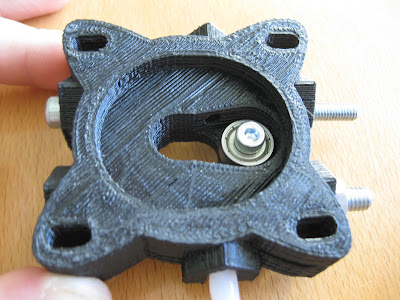
I’m driving the extruder with my ‘remote’ drive mechanism:
 |
| From RepRap Dev |
You can put a beefy NEMA23 on it to have a lot of torque and without much complexity (just the part, a motor, a bearing and a pinch wheel).
It is pushed into a Bowden cable (a PTFE tube). At the hot end, I’m using my new coupling to keep the Bowden cable attached to it:
 |
| From RepRap Dev |
There’s documentation available for it on Thingiverse, as are the models to download and print this add on. The parts/suppliers that I used for this can also be found at Thingiverse.
It’s good to see the mini working. I talked RustySpoon1121 into printing me a set of mini parts. Should have them in about a week or so. He said he was going to print a set for himself too. It won’t be long before there are several working minis.
Cool! I’ve also printed a second mini-mendel set (almost, just missing some smaller bits). They’re for a conference ( http://www.shift.pt ). I will be sending the parts ahead of me and they will build it there and keep the (hopefully by then) working machine.
Hello!
I want to by complete kit of mini Mendel
with motors, board and plastic cord and others.
mail to xin@mail.ru
Best regards
Hey. Why don’t you print a third set and put put it up on ebay. Would be interesting to see how much it would go for. I know I would bid on it.
Unless I can talk you into printing me a set? 🙂
I’m both short of time and RepRap is costing me too much money, but I value my time more right now. It takes about 24 hours of printing and I need to get it to be more unattended first. I think the last kit took me 10 hours of human attention, so that’s way too much. But that included post-processing which the buyer can easily do as well (about 2 hour for the 100+ parts).
Dear Erik,
Im very interested about your bitsfrombytes firmware modification.
Could you please elaborate a bit?
Laszlo
It’s mostly in svn in the main reprap respository. I’ve got a version there that compiles for me in MPLAB 8.40. It worked for me on a v3.0 board (but it should also work on the newer, 3.1 board). No guarantees though!
I’m extending their normal and development version to allow some interesting features. I don’t have endstops, so I changed it so that you can push a button to skip homing and home it manually. I’m also working on fixing bugs in multi-material support (that’s why there are two extruders in my mini-mendel!)
If you get this to work, please help me document it as I haven’t had the time for it yet and my installation is not a clean one so it might work for me for reasons I can’t remember anymore!
My language tool versions: pic32-as.exe v1.05, pic32-gcc.exe v1.05, pic32-ld.exe v1.05, pic32-ar.exe v1.05.
I Really want to build a mini mendel but don’t have a 3d printer yet. Is there anybody out there that would print the part at a reasonable price for me? Email me at Robotguy@bellsouth.net
In the Sprint of OPEN SOURCE I am also willing to make a deal. If somebody would print the parts for cost plus shipping I will print 2 copies to give to the next people that do the same I did. And they would be under the agreement to print 2 more copies and so on. I find the biggest problem with the mendel & Darwin is somebody to print the parts for a fair price.
That’s what I thought the model should have been all along, and the mini mendel seems to be the most suitable design.
Assuming I haven’t worked out another way to get mine before it becomes available (I’m also watching the ebay listings and fiddling with a cartesian bot from a kit), I would gladly buy a set on those terms.
yes getting started is always the hard part.
hey, I’m working on getting all my hardware together while my buddy prints my mini parts on his M4. I was hoping you could tell me how many of each bearing you’re using. between this post, the wiki parts list, the “pricing mendel mini” blog post, and the docs in the reprap svn, I’ve got 4 different values. I’m only trying to build the base printer, and not the spool holder underneath. thoughts?
By my count, there SHOULD be 14 for the x axis, 15 for the y axis, and 15 (plus the two 626) for the z axis, plus one for the original mini mendel extruder block if you use it, which I wouldn’t recommend. I built mine with a few less, and theoretically it might be possible to omit as many as 9 of these, but again, not recommended.
I’ve got a new x carriage almost ready for release that replaces the 10 623 bearings in the original with 2 623s and one LM6UU linear bearing, while also removing the need for my belt pulley extenders.
http://www.flickr.com/photos/7820200@N05/5110774935/
http://www.flickr.com/photos/7820200@N05/5111377310/
In December last year, I became the proud new owner of Leo (after Leonard Darwin), the son of Charly (Charles Darwin (my earlier machine)). It didn’t take 9 months to fully develop, but it seemed like a long time (the second and third sets of parts tooks