The quest for support material support
In general, there are three general methods to making objects.
- Formative: By (de)forming matter, such as bending a metal beam into an angle. Or a big steel sheet into an enclosure, or making a box out of cardboard, but also injection moulding, forging, etc.
- Subtractive: By removing matter. For example by hacking or filing away material, punching, drilling or milling.
- Additive: By adding batter matter. For example clay modeling, and 3D printing!
The formative processes tend to require a master, die or mould that already has the correct shape. The die has to withstand the forces of the material, in many applications this requires heavy industrial equipment. In many examples of formative processes a mould is used for batch production of similar items, or you sacrifice a mould for every object that you make. This can be expensive for small series, plus you still depend on another process that makes the moulds or master shape.
The subtractive machines always require a larger work piece than the object that is to be made. For complex shapes, it may be very hard for a tool to reach certain area’s of an object, and many shapes are impossible because a tool could never reach all areas where material is supposed to be removed. Milling can be energy intensive and tools can have a lot of wear. Often lubricants and coolants are needed to increase tool life and get a good surface finish. Many milling and cutting machines can be operated by computers (CNC controlled) and their uses are flexible (not job specific).
Additive fabrication, such as 3D printing generally has a low production speed, but is highly flexible. Unique objects do not cost more than series, which makes it useful for custom items, relative to other techniques. Compared to milling, 3D printing is in general less knowledge intensive for the user, because it requires no tool changes, you do not need to affix the stock material. It’s also isn’t as noisy.
But perhaps what makes layer-wise additive fabrication, especially unique is its freedom of shape. That’s why the process has also been called solid free form fabrication (SFF).
If you have a machine that makes objects by building one layer on top of the previous one, you have a lot of options in terms of the shape of that object. For example, you could make a hollow pyramid, or an object with a cavity some other object inside it. Also, other objects could be added to the product during production, and become embedded in it when the 3D printer closes it up (ideal for smuggling goods?!). Or composite objects can be created by filling cavities with a different material.
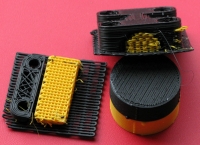
But in this layer by layer process, material needs to be added the right place. To keep things simple, I often say that without support material, some material will fall down when you have nothing to print on. This is called support material, or sacrificial material. It could be material that you remove from the object later. If it is not completely fused to the object, which is determined by the temperature, it will not stick to the object too much. Still, it is hard or even impossible to remove structures, especially from cavities or enclosed areas. In this case a way of removing the material by making it liquid or by dissolving it is needed. The RepRap uses an operating principle similar to FDM from the commercial manufacturer Stratasys. What they do is use a polymer that degrades in caustic soda. This is a water based solution, so they call it WaterWorks, but you don’t want to get this stuff in your eyes, or you will risk permanent blindness. It also dissolves skin and your clothing, so the search for a more friendly substance should not stop here. There are recent successes to printing two different materials together in the same print-job, but there still is some work to be done to get support material working fool-proof. I’ve experimented with PLA (polylactic acid) and it dissolves in caustic soda similar to the brown WaterWorks polymer that Stratasys uses.
In some cases you don’t need support material. The entire RepRap was designed so that a 3D printer without a support material capability can make it. A rule of thumb used to be that if you build a wider layer on top of a narrow layer, you can do this up to about a 45 degree angle. In other words, if you go up 0.3 milimeter, you can go outward 0.3 milimeter. In this case there is enough contact area for the plastics to fuse together and the newly extruded plastic is still pushed reasonably in the direction of the material that’s already there. But a rule of thumb would be a law if it were always true. And there are exceptions to this rule. For example, you can span a void by moving from one stable point to the other.
Of course this is not a one size fits all solution, but it can save a lot of support material.
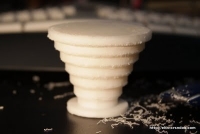
Ahrimed recently posted the 3D files for a round shaped item for testing overhangs.
Objects that are round in the XY-plane allow for higher overhang angles because you’re also wrapping filament around the already printed perimeter. I would not be amazed at all of you could print completely horizontal overhangs or even slightly negative angles, as long as you’re fusing the newly extruded material with the material that’s there. I would be positively happy to find out that this is possible, though! As discussed in the RepRap in space post and this discussion thread, it is not gravity that is determining where material ends up, but mostly the structure that is there and the direction of the force by which new material is added.
Printing unsupported horizontal planes seems feasible if you’ve printed with layer height .20 mm. For round items you end up extruding as much to the outside of the object as you are extruding on top of it. Gravity is not affecting the process much, the material is too light and too viscous and sticky for that.
Still, Ahrimed’s item is a great benchmark item to test this possibility with. I think that, without very strict tolerance requirements you could print horizontally with non-circular objects as well. You cannot wrap filament around it, but you can extrude it to the side of a perimeter, very close to it, and while doing this, push down this outer perimeter by making it soft because of the heat that’s in the newly extruded filament. You essentially mechanically massage the perimeter flat with the extruder hovering at a constant height (or perhaps even actively pushing filament down a bit).
So, to summarise:
We’re just starting to find out how to make support material and now we’re reducing the need for it 😉
Well, since the horizontal unsupported layers would not resist warping, it will get really complicated if you’re going to compensate for that to get the object how you like it. Rigid support structures are probably essential to consistently get reliable objects across a range of slightly different additive digital fabricators.
What do you think?


In the previous post, I described the rationale for adding a support material capability. It’s not needed for every object, but to have consistent results with tight tolerances, for many objects you cannot do without it. Also, by solving support material